


Learn How to Make The Perfect Crispy Keema Samosa
There’s something absolutely irresistible about a freshly fried Crispy Keema Samosa: the first bite gives a shatteringly crisp crust, and then the warm, fragrant filling of spiced minced meat blooms across your taste buds. The aroma of cumin, ginger, garlic, and garam masala frying in oil will have your kitchen smelling like a bustling street stall in no time.
Popular as a street food and a beloved tea-time snack, keema samosas are a crowd-pleaser at gatherings, lunchboxes, and late-night cravings alike. This guide walks you through every step — from a robust, moist keema filling to a flaky, golden pastry and the crucial fold-and-seal technique — so even if your first fold isn’t perfect, your results will still be delicious.
Prep time: 30 minutes
Cook time: 25 minutes (plus frying time)
Total time: ≈ 55–60 minutes
Yield: About 18–22 medium samosas (depending on size)
Difficulty: Intermediate
Ingredients
For the Meat Filling (Keema)
- 500 g minced meat (keema) — lamb/mutton preferred for authenticity; beef or chicken works too (about 1.1 lb)
- 2 tbsp oil (30 ml)
- 1 tsp cumin seeds (5 g)
- 1 medium onion, finely chopped (≈150 g)
- 1 tbsp ginger–garlic paste (15 g)
- 2 green chilies, finely chopped (optional)
- 1 tsp turmeric powder (2 g)
- 1 tsp red chili powder (2–3 g) — adjust to taste
- 1 tsp ground coriander (3 g)
- 1 tsp garam masala (3 g)
- 1 tsp salt (adjust to taste)
- 100 g frozen or fresh peas (optional)
- 2 tbsp chopped fresh cilantro (coriander leaves) (8–10 g)
- 1 tsp lemon juice (5 ml)
- 30–50 ml water (only if needed to keep filling moist)
Optional add-ins for extra flavor
- 2 tbsp finely chopped mint leaves
- 1–2 tbsp roasted, coarsely chopped cashews (for texture)
- A pinch of amchur (dry mango powder) or chaat masala for tang
For the Pastry / Dough
- 250 g all-purpose flour (≈2 cups)
- 2 tbsp vegetable oil or ghee (30 ml)
- 1/2 tsp salt (2–3 g)
- 90–120 ml cold water (about 6–8 tbsp) — add gradually
- 1 tbsp semolina (rava/sooji) OPTIONAL for extra flakiness (10 g)
Slurry (to seal edges)
- 2 tbsp all-purpose flour (16 g)
- 4–6 tbsp water (60–90 ml) — mix to a paste of spreadable consistency
For Frying
- Vegetable oil, enough for deep frying (about 1–1.25 liters), heated to 170–180°C (340–355°F)
Step-by-Step Instructions
Phase 1 — Preparing the Keema (Filling)
- Heat oil in a heavy skillet over medium heat. Add the cumin seeds and let them sizzle for 20 seconds.
- Add chopped onions and sauté until translucent and just starting to brown — this builds flavor.
- Stir in ginger–garlic paste and green chilies (if using); cook 1 minute until the raw smell disappears.
- Add the minced meat and break it up with your spatula. Cook on medium-high until the meat loses its pink and begins to brown.
- Sprinkle turmeric, red chili, coriander powder, and salt. Mix well so spices coat the meat.
- If using peas, add them now and cook until peas are tender and any excess moisture has evaporated. If the mixture seems dry, add up to 30–50 ml of water and simmer briefly.
- Finish by stirring in garam masala, cilantro, and lemon juice. Taste and adjust salt or spice. Let the filling cool completely — very important before stuffing.
Phase 2 — Making the Dough
- In a bowl, combine flour, semolina (if using), and salt. Add oil/ghee and rub into the flour until the mixture resembles coarse breadcrumbs.
- Gradually add cold water and knead into a firm, smooth dough (slightly stiffer than chapati dough).
- Cover the dough with a damp cloth and rest for 20–30 minutes. Resting relaxes gluten and helps create a flaky texture.
Phase 3 — Shaping & Folding Techniques (Crucial!)
Method A — Half-circle cone (recommended for neat triangles)
- Divide the dough into 18–22 equal balls. Roll each ball into a 4–5 inch circle (10–12 cm), then cut each circle in half to make two semicircles.
- Take one semicircle with the straight edge facing you. Brush the straight edge lightly with the flour slurry.
- Fold the semicircle into a cone by bringing the two straight-edge ends together and overlapping slightly; press to seal the edge.
- Fill the cone with 1–2 tablespoons of cooled keema (do not overfill).
- Wet the open edges with slurry, flatten the top slightly, and fold the open edge down to form a neat triangle. Press firmly to seal.
- For any small gaps or weak seals, use a pinch of dough as a patch and seal again with slurry.
Method B — Classic circular fold (alternate)
- Roll dough into slightly larger circles, form a cone by folding and cutting a small flap, stuff, and fold to a triangle —the same sealing rules apply.
Key folding tips
- Don’t overfill — the filling should sit comfortably in the triangle without bulging.
- Seal well with slurry — this is what prevents bursting in the oil.
- If you see any thin spots, patch them with a little dough.
Phase 4 — The Frying Process
- Heat oil to 170–180°C (340–355°F). If you don’t have a thermometer, drop a small piece of dough — it should sizzle and rise slowly without browning instantly.
- Fry samosas in batches; do not overcrowd the pan. Lower them carefully into the oil.
- For the first 30–45 seconds, maintain medium heat so the pastry sets and forms a shell. Then lower the heat slightly so the samosas cook through without burning, turning occasionally for even color.
- When samosas are golden-brown and bubbly (the “bubbles” are tiny blisters on the crust), remove with a slotted spoon and drain briefly on a wire rack or paper towel. Avoid resting for long on paper that will steam the bottom and make it soggy.
- Serve hot for the best texture and aroma.
Pro-Tips for Success
- Correct oil temperature is everything. Too cool = oily samosas; too hot = browned outside, raw inside. Aim for 170–180°C (340–355°F).
- To get that perfect “bubble” on the crust, make sure your dough is rested, not too thin, and fry at a steady medium temperature. A slightly elastic, well-rested dough develops small blisters as moisture inside steam-cooks the pastry.
- Prevent greasiness: fry in properly heated oil, don’t overcrowd, and drain briefly on a wire rack (not stacked).
- Avoid bursting: allow the filling to cool before stuffing; seal with the slurry; don’t overfill.
- Freezing: Arrange sealed, unfried samosas on a tray and freeze until firm; then transfer to freezer bags. Fry from frozen — add 1–2 minutes to frying time and keep othe oila bit cooler at first so the pastry cooks through.
- Make-ahead: You can prepare the keema and dough a day ahead. Keep the filling refrigerated and the dough covered.
Pairing Suggestions
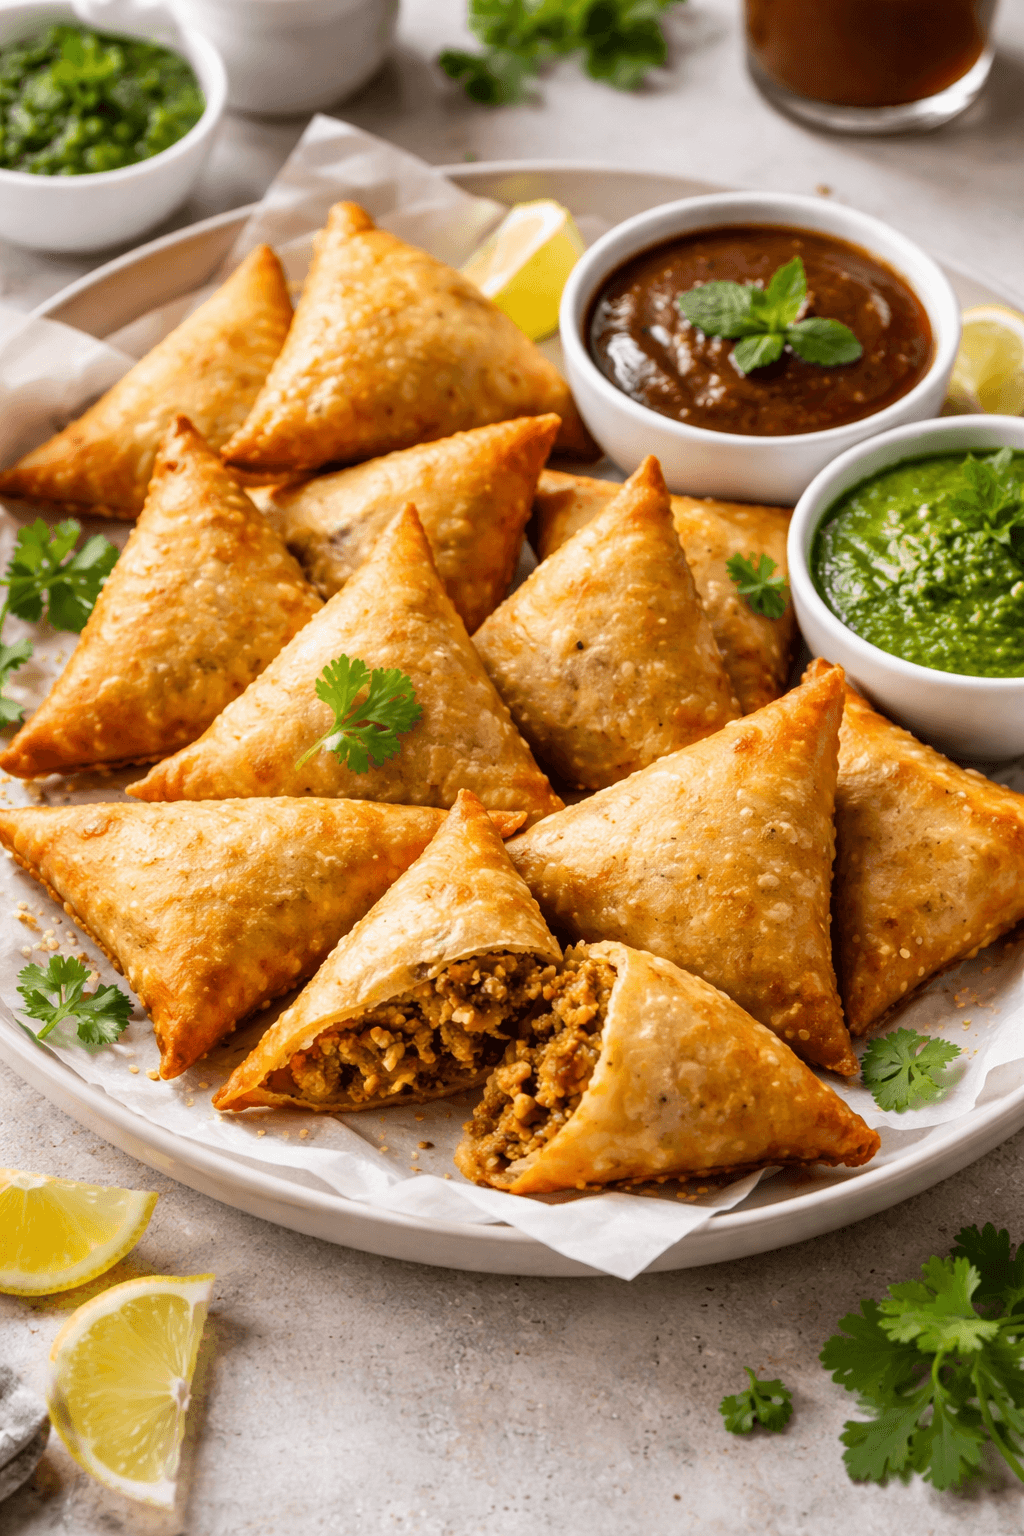
- Mint Chutney (fresh cilantro + mint + green chili + lemon) — bright, tangy contrast.
- Tamarind (Imli) Chutney — sweet-and-tart for classic street-samosa vibes.
- Cool Yogurt Raita with cucumber and roasted cumin — soothes the spice.
- Masala Chai — a classic tea-time companion; spiced and warming.
- Mango Lassi or lime soda — refreshingly cooling options.
Frequently Asked Questions (FAQ)
Can I air fry these?
Yes. Brush each samosa lightly with oil or spray with oil. Air-fry at 200°C (390–400°F) for about 12–15 minutes, flipping halfway, until golden and crisp. They won’t be quite as shatteringly crisp as deep-fried, but air-frying is a lighter alternative that still gives good texture.
What meat is best for keema?
Lamb (mutton) keema gives the most authentic, rich flavor. Beef and chicken work — chicken will be lighter and less fatty. For a vegetarian twist, replace meat with mashed potato + peas or spiced crumbled paneer/soya.
How do I prevent samosas from bursting while frying?
Make sure the filling is cooled and not too wet; seal edges thoroughly with the flour slurry; don’t overfill; and keep oil at a steady medium temperature so the pastry sets before the interior steam builds.
Can I bake samosas?
Yes — brush with oil and bake at 200°C (390–400°F) for 20–25 minutes, flipping once. They will be golden and lighter but less crisp than deep-fried.
How long do leftovers keep?
Store in the fridge for up to 2 days. Re-crisp in a hot oven or air fryer for best results.
Final Encouragement
Don’t worry if your first batch isn’t perfect — folding takes a little practice, and every kitchen has its own rhythm. Your kitchen is about to smell amazing, and each imperfect triangle will still taste wonderful. Once you get the hang of the dough texture and the folding technique, you’ll be producing golden, flaky, spiced-to-perfection Crispy Keema Samosas in no time. Happy cooking!
Authentic Crispy Keema Samosas
Ingredients
Equipment
Method
- Heat oil in a pan and add cumin seeds. Once aromatic, sauté chopped onions until lightly golden.
- Add ginger garlic paste and green chilies. Cook briefly until fragrant.
- Add minced meat and cook while breaking it apart until browned and no longer pink.
- Stir in turmeric, red chili powder, coriander powder, salt and peas. Cook until the mixture is dry and well combined.
- Finish with garam masala and chopped cilantro. Allow the filling to cool completely.
- For the dough, combine flour, salt and oil in a bowl. Rub until crumbly then add water gradually to form a firm dough. Cover and rest for 20 minutes.
- Divide dough into small balls. Roll each into a thin circle and cut in half to form semicircles.
- Form each semicircle into a cone, seal the edge with flour slurry and fill with the cooled keema mixture.
- Seal the open edge with slurry to create a triangular samosa. Ensure all edges are tightly sealed.
- Heat oil to medium temperature and fry samosas in batches until golden brown and crisp.
- Remove using a slotted spoon and drain on paper towels. Serve hot with mint chutney or tamarind sauce.